What You Will Build by the End of This Webflow Portfolio Tutorial
- A professional portfolio website with a homepage, project pages, About page, and Contact page
- Built in Webflow — no code required
- Optimised for mobile, with basic SEO settings configured
- Ready to publish to a free webflow.io subdomain, or a custom domain when you are ready
- Estimated time: 2 to 4 hours for a beginner using a template
You know you need a portfolio website. You have projects worth showing. But every time you open a website builder, you either get lost in too many options or end up with something that looks like every other portfolio on the internet.
Webflow solves both of those problems. It gives you real design control without requiring you to write code, and the results look nothing like a default template — because everything is genuinely customisable.
This Webflow portfolio tutorial walks you through the entire process from scratch. If you have never opened Webflow before, that is fine. By the end, you will have a working portfolio website you are actually proud to share.
Why Webflow Works Well for Portfolio Websites
Before jumping into the steps, it helps to understand why Webflow is worth using for a portfolio rather than simpler tools like Squarespace or Wix.
The key difference is design freedom. Most website builders lock you into a grid-based layout where elements snap to predefined positions. Webflow’s visual editor lets you control spacing, sizing, typography, and positioning at a much finer level. The result is that a portfolio built in Webflow can look genuinely custom without requiring any coding knowledge.
Webflow is also the platform of choice for many professional web designers and creative freelancers. Building your portfolio there signals technical confidence to potential clients or employers, even if you used a template as a starting point.
Related: New to Webflow? Read our full beginner’s guide — What Is Webflow
Not Sure Webflow Is Right for You?
If you are still deciding between website builders, check our comparison: Webflow vs Framer and our guide to the Best Website Builders for Beginners for a broader view before committing.
Before You Open Webflow: What to Prepare
Most beginners open Webflow before they are actually ready to build. They spend hours making design decisions that could have been made in 20 minutes of planning. Do this first.
Decide What Your Portfolio Is For
A freelance designer portfolio has a different goal than a junior developer looking for their first job, which is different again from a photographer selling prints. Knowing your goal shapes everything: which projects to feature, what tone to use, and what your call to action should be.
Client-facing freelance portfolio: Lead with results and what you do for clients. Make it easy to contact you.
Job-seeking portfolio: Show your process and technical skills. Make it easy to download your CV or link to your LinkedIn.
Creator or artist portfolio: Lead with visual impact. Make the work the hero.
Choose Your Projects (3 to 5 Is the Right Number)
Quality beats quantity in a portfolio. Three strong, well-documented projects will always outperform ten screenshots with no context. According to Webflow’s own portfolio guidance, you should highlight the work that represents you best and focus on the kind of projects you want to attract more of.
For each project you plan to feature, gather:
- A clear project title and one-line summary
- 2 to 4 high-resolution images or screenshots
- A short description of the problem, your role, your process, and the outcome
- Any measurable results, if available
Content and Assets to Have Ready
Trying to write your bio and collect images while you are mid-build breaks your flow and adds hours to the process. Before opening Webflow, have these ready:
Asset | What to Prepare |
Profile photo / headshot | A clear, professional-looking photo at 800px minimum width |
Project images | 2 to 4 images per project — JPG or PNG, consistent dimensions |
Bio text | 50 to 100 words about who you are, what you do, and who you help |
Project descriptions | 3 to 5 sentences per project covering problem, role, and outcome |
Contact details | Your preferred contact method — email, LinkedIn, or a form |
Colour palette (optional) | 2 to 3 brand colours in hex codes if you have them |
The Step-by-Step Webflow Portfolio Tutorial
Step 1: Create Your Webflow Account
Go to webflow.com and click Get started for free. You can sign up with an email address or with Google.
Webflow’s Starter plan is free and gives you everything you need to build and test your portfolio before paying for anything.
What the Starter plan includes for building:
- Unlimited design workspace in the editor
- Ability to publish to a free yourname.webflow.io subdomain
- Access to free and paid templates in the Webflow Marketplace
You will need a paid plan to publish to a custom domain (for example, yourname.com). For this tutorial, the free plan is enough to build and test your full portfolio first.
Pricing note: Always check webflow.com/pricing for the latest plan details before upgrading.
Step 2: Start a New Project and Choose a Template
After logging in, you will land on your Webflow dashboard. Click New project.
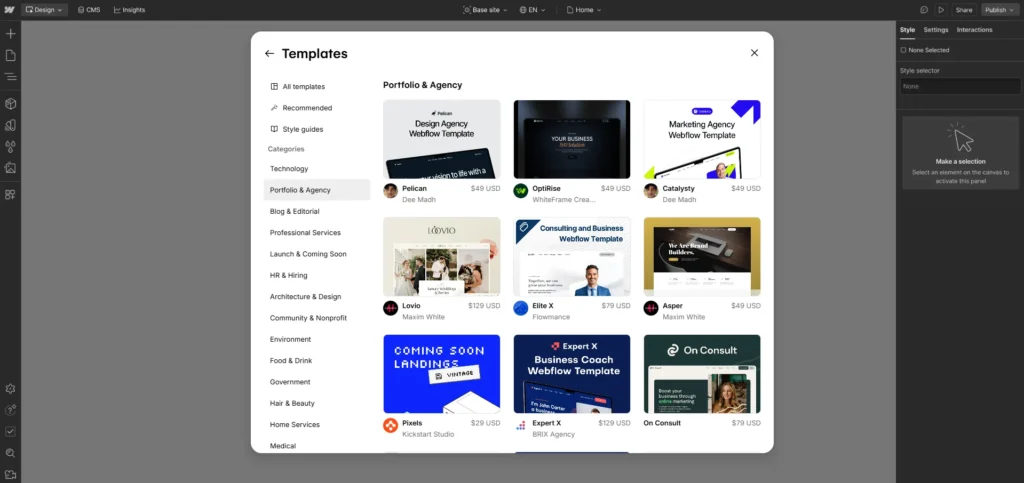
You will be asked whether to start with a blank canvas, use an AI layout, or choose a template. For beginners, choose a template.
How to choose the right portfolio template:
- Browse the portfolio category in the template library
- Filter by free templates if you want to avoid upfront cost
- Choose a template that matches your field — design, development, photography, writing
- Look for a template that already has the pages you need: home, project, about, contact
- Do not choose based on colours or fonts alone — those are easy to change
Once you select a template, Webflow creates a copy of it as your project. The template’s content is all placeholder text and images — you will replace everything.
Template tip: RexoHub covers the best Webflow templates for beginners, if you want curated options before browsing the full library.
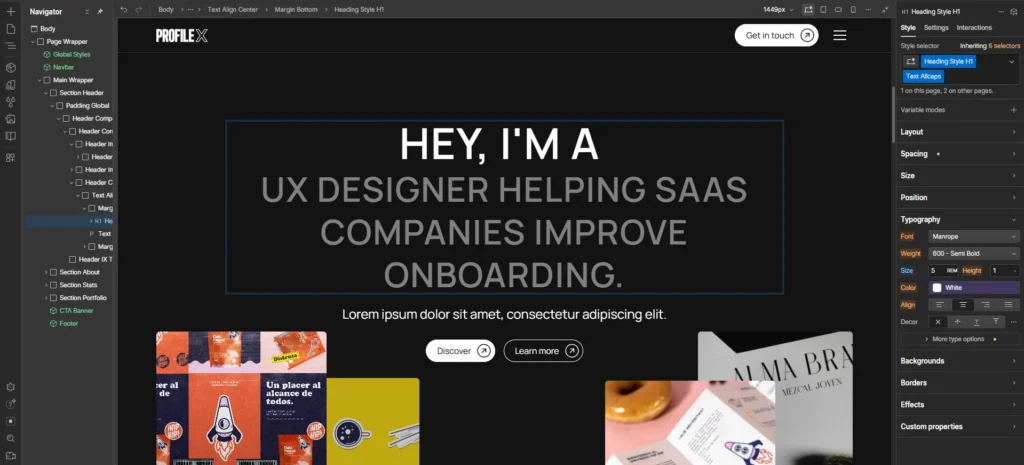
Step 3: Set Your Global Styles First
Before changing any page content, set your global styles. These are site-wide settings that control how your fonts, colours, and base spacing look across every page. Setting them first saves you from manually updating the same thing dozens of times later.
In the Webflow Designer, open Style Manager and update:
- Primary colour — your main brand or accent colour (used for buttons, links, highlights)
- Background colour — typically white, off-white, or a dark tone for dark-mode portfolios
- Heading font — choose something that reflects your personality (Webflow includes Google Fonts)
- Body font — prioritise readability. Inter, DM Sans, and Sora are popular clean choices
You can also update the favicon (the small icon that appears in browser tabs) by going to Project Settings and uploading a small square image of your logo or initials.
Beginner tip: If you do not have a colour palette yet, use a single accent colour and keep everything else in neutral black, white, and grey. Minimal colour choices always look more professional than too many.
Step 4: Build Your Homepage
Your homepage is the most important page in your portfolio. It needs to do three things immediately: tell visitors who you are, show them your best work, and make it obvious how to contact you.
Hero section (top of the page):
- Replace the template headline with a clear statement of what you do and who you do it for. For example: ‘UX Designer helping SaaS companies improve onboarding.’
- Add your profile photo or a strong visual that represents your work
- Include a clear call to action button: ‘See my work’ or ‘Get in touch.’
Featured projects section:
- Show 3 to 4 project cards with a thumbnail, project title, and a one-line description
- Link each card to its individual project page
Short about preview:
- Add a 2 to 3-sentence introduction about yourself with a ‘Read more’ link to your About page
Content tip: Webflow’s own portfolio guidance recommends leading with the work you want to attract more of — not just your best work, but your most relevant work for your target audience.
Step 5: Create Individual Project Pages
This is the step most beginners skip, and it is the one that makes the biggest difference. A homepage that just shows project thumbnails with no detail tells a potential client almost nothing.
Each project should have its own page with a structured case study format. You do not need to write an essay — even a focused 200 to 300 words with clear visuals is enough.
Structure for each project page:
- Project title and a one-line description
- Your role and the timeframe (e.g. ‘Lead Designer, 6 weeks’)
- The problem or brief — what were you asked to solve?
- Your approach — what decisions did you make and why?
- 2 to 4 visuals showing the work
- The outcome — what was the result? Include numbers if you have them.
- A brief next steps or CTA — ‘Have a similar project? Get in touch.’
Duplicate your first project page template for each additional project to keep visual consistency.
Case study insight: According to conversion data from portfolio site research, case studies that explain process and outcome convert approximately 75% better than pages showing only final visuals.
Step 6: Add Your About Page
Your About page is not your CV. It is where a potential client or employer decides whether they want to work with you as a person.
What to include:
- A short paragraph about who you are and what you do — written for the reader, not about yourself
- Who you typically work with (industries, company sizes, project types)
- Your background or how you got into your field — brief and human, not a list of job titles
- A photo that shows your face clearly
- A direct call to action at the bottom: ‘Interested in working together? Reach out.’
Keep the About page under 300 words. Visitors scan — they will not read a long bio.
Tone tip: Write as if you are answering the question ‘What is it like to work with you?’ rather than ‘What have you done?’
Step 7: Build Your Contact Page
Make it as easy as possible for someone to contact you. Every extra step between a visitor and reaching out is an opportunity to lose a lead.
Contact page options:
- A simple Webflow form (name, email, message) — connects to Webflow’s form submissions inbox on paid plans or can be connected to services like Formspree on the free plan
- A mailto link — the simplest option, just a button that opens the visitor’s email client addressed to you
- Links to your LinkedIn and other professional profiles
Do not overthink the Contact page. A clear headline (‘Let us work together’), one form or email link, and your location and availability is all you need.
Availability tip: Adding a short ‘Current availability’ note (e.g. ‘Available for new projects from July 2026’) makes you feel more real and saves you from receiving irrelevant enquiries.
Step 8: Configure Basic SEO Settings
Even a portfolio website benefits from basic SEO. When a potential client Googles your name, you want your portfolio to appear. Webflow makes SEO settings accessible without needing any technical knowledge.
For each page, go to Page Settings and add:
- Page title: Your name + what you do + location if relevant (e.g., ‘Alex Chen — UX Designer — London’)
- Meta description: A 1 to 2 sentence summary of the page — what the visitor will find and why it matters
For all images, add alt text:
- Click any image in the editor and add a short description in the Alt text field
- Good alt text: ‘UX design case study screenshots showing onboarding flow redesign for SaaS dashboard.’
- Bad alt text: ‘Image1.jpg’ or leaving it empty
Also, check Project Settings to add a site-wide title format and enable your sitemap. Webflow generates a sitemap automatically.
SEO note: Portfolio SEO is primarily about your name and specific skills. Focus on consistent naming across your site, LinkedIn, and any other professional profiles for the best results.
Step 9: Check Mobile Responsiveness
Webflow shows you your site at different breakpoints — desktop, tablet, landscape phone, and portrait phone — using icons in the top toolbar. Check each one before publishing.
Common mobile issues to look for:
- Text that is too large or too small at mobile sizes
- Images that overflow the screen or lose their aspect ratio
- Buttons that are too small to tap comfortably
- Navigation that overlaps content
- Project card grids that stack correctly on small screens
Templates are generally responsive out of the box, but your custom content and images may need minor adjustments. The Webflow editor lets you make changes at each breakpoint independently without affecting other screen sizes.
Testing tip: After fixing issues in Webflow’s preview, open the published staging URL on your actual phone to check the real experience. The in-editor preview is a close approximation, but not identical.
Step 10: Publish Your Portfolio
When you are happy with how everything looks, it is time to publish.
Publishing options:
- Free subdomain: Click the Publish button in the top right of the Webflow Designer and publish to yourname.webflow.io — this is free on the Starter plan
- Custom domain: Upgrade to a paid plan, purchase a domain (you can buy directly through Webflow or use a third-party registrar), and connect it in Project Settings
For sharing early drafts with clients or employers, the webflow.io subdomain works perfectly. Upgrade to a custom domain when you are ready to present it as your primary professional online presence.
After publishing:
- Share the URL with a few people you trust and ask for honest feedback
- Test every link, form submission, and navigation element on the live site
- Update your LinkedIn and other profiles with your new portfolio URL
Publish tip: A live portfolio with placeholder content removed and your real projects added is ready to share. Do not wait for perfect — a published portfolio beats a perfect unfinished one every time.
Three Things Most Webflow Portfolio Tutorials Do Not Cover
Most step-by-step guides get you to a published site and stop there. Here are three things worth knowing that come next.
Your Portfolio is a Live Document, Not a Finished Project
The best portfolios are updated regularly. When you complete a new project worth featuring, add it. When older work no longer represents your current skill level, remove it. A portfolio that was last updated two years ago signals to a potential client that you may not be actively working. Set a reminder to review your portfolio every three to six months.
Context Converts Better Than Visuals Alone
A visually impressive portfolio with no explanation of your process will still lose clients and job opportunities to a simpler portfolio that explains the thinking behind the work. When you build your project pages, resist the urge to just show the final result. A brief explanation of the problem, your approach, and the outcome is what makes a hiring manager or potential client confident that you can do the same for them.
Animations Are Optional — Speed Is Not
Webflow makes it easy to add animations and scroll interactions, and many portfolio tutorials heavily emphasise this. For a beginner, animations are worth skipping on the first version. A fast, clear, well-organised portfolio with no animations is more effective than a slow, animated one. According to web performance research, a 100ms delay in page load time can reduce conversion rates by around 7%. Get the content and structure right first. Add animations on version two if you want them.
Frequently Asked Questions
Can a complete beginner build a portfolio in Webflow?
Yes. Webflow’s visual editor lets you build a portfolio without writing any code. Starting from a portfolio template makes the process even more beginner-friendly because the layout structure is already built for you. Most beginners can have a working portfolio published within one to three hours using a template.
Is Webflow free to use for a portfolio website?
Webflow’s Starter plan is free and lets you build and test your full site without paying anything. Publishing to a custom domain requires a paid plan. You can publish to a free yourname.webflow.io subdomain at no cost on the Starter plan. Check webflow.com/pricing for current plan details before upgrading.
How many projects should I include in my portfolio?
Three to five projects is the right range. Quality matters more than quantity. A potential client will judge you on your strongest work. Five well-documented case studies with clear context and results will always outperform fifteen screenshots with no explanation.
What pages does a portfolio website need?
At minimum: a homepage, individual project pages, an About page, and a Contact page. Optional additions include a blog, a services page, or a testimonials section. Keep the structure simple until your portfolio is live and you have received feedback from real viewers.
Should I use a Webflow template or build from scratch?
For beginners, starting with a template is the right choice. Templates provide a proven page structure, pre-built responsive sections, and a starting point that you can fully customise. Building from scratch is worth doing once you understand Webflow’s editor and want a completely custom layout. For a first portfolio, use a template and focus your energy on the content.
Your Portfolio Is Closer Than You Think
The most common mistake in this Webflow portfolio tutorial is reading it and waiting for the perfect moment to start. That moment does not exist.
You have the projects. You have the skills. What you need now is a clean space to show them, and Webflow gives you exactly that — for free, without writing a single line of code.
Follow the ten steps in this guide, use a template to get started quickly, and focus your energy on writing honest, specific descriptions of your work. That combination — clean design, real project context, and an easy way to contact you — is what turns a portfolio visitor into a client or a job offer.
Open Webflow today. Your portfolio does not need to be perfect to be worth sharing. It just needs to exist.
Ready to Find the Right Template?
RexoHub covers the best Webflow templates for portfolio sites, filtered specifically for beginners — free and paid options with an honest breakdown of each one. Visit rexohub.com/best-webflow-templates-for-beginners/ to find your starting point.